python_细究tkinter

thanks to Live Programming Mode - Python Tutor - Visualize Python and JavaScript code

sticky= N+S:有此参数的进行上下对齐,由最大的决定大小

sticky=

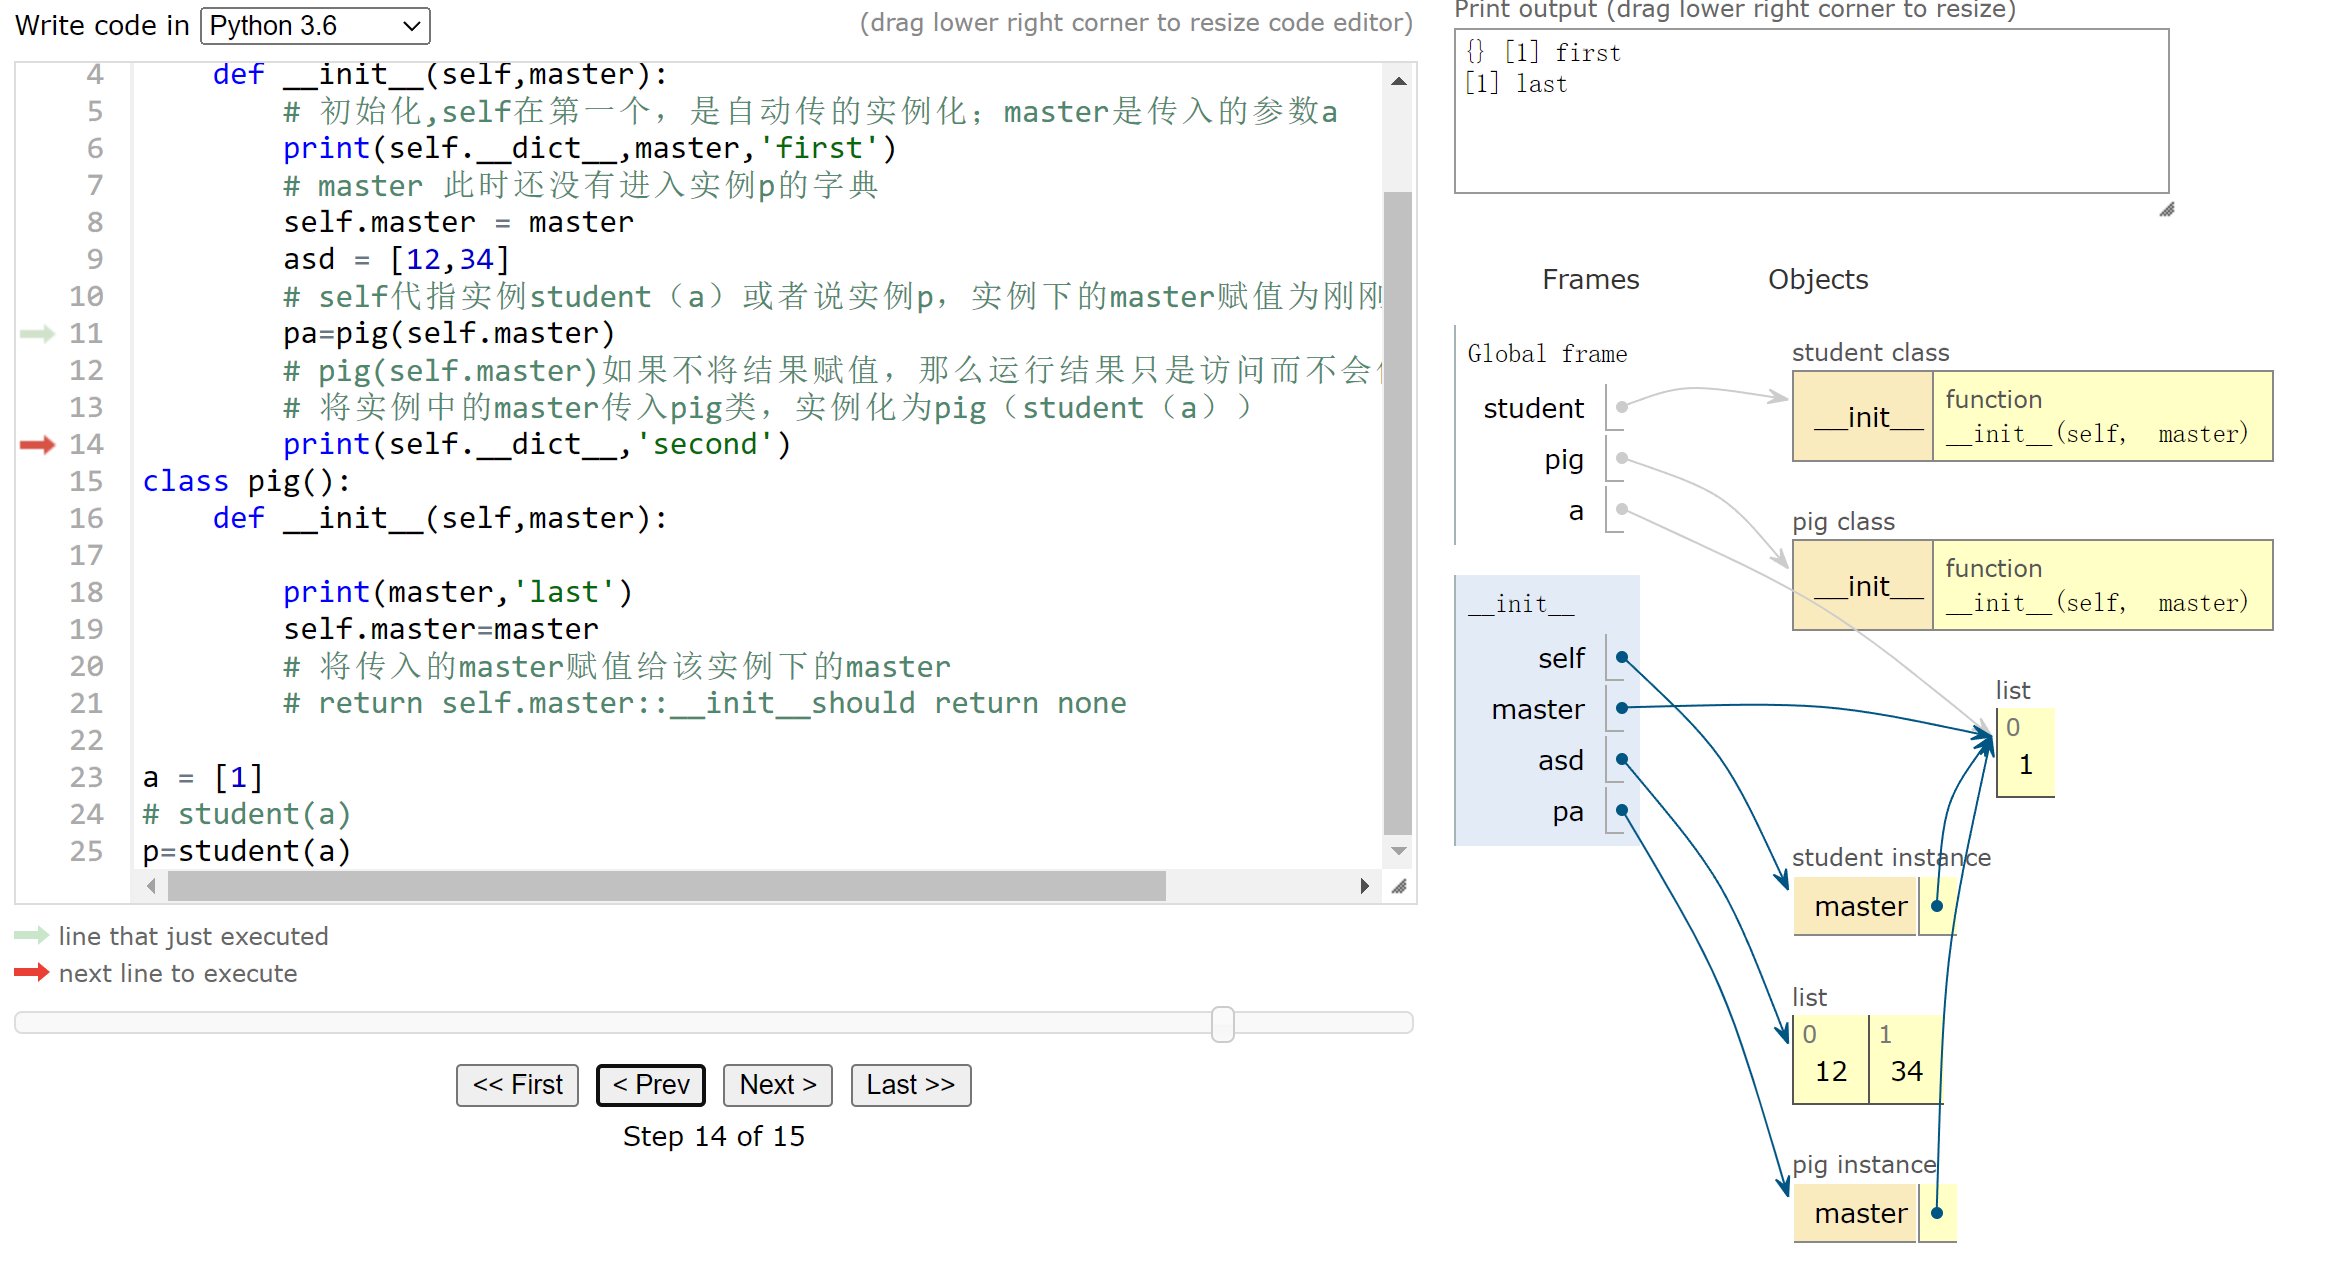
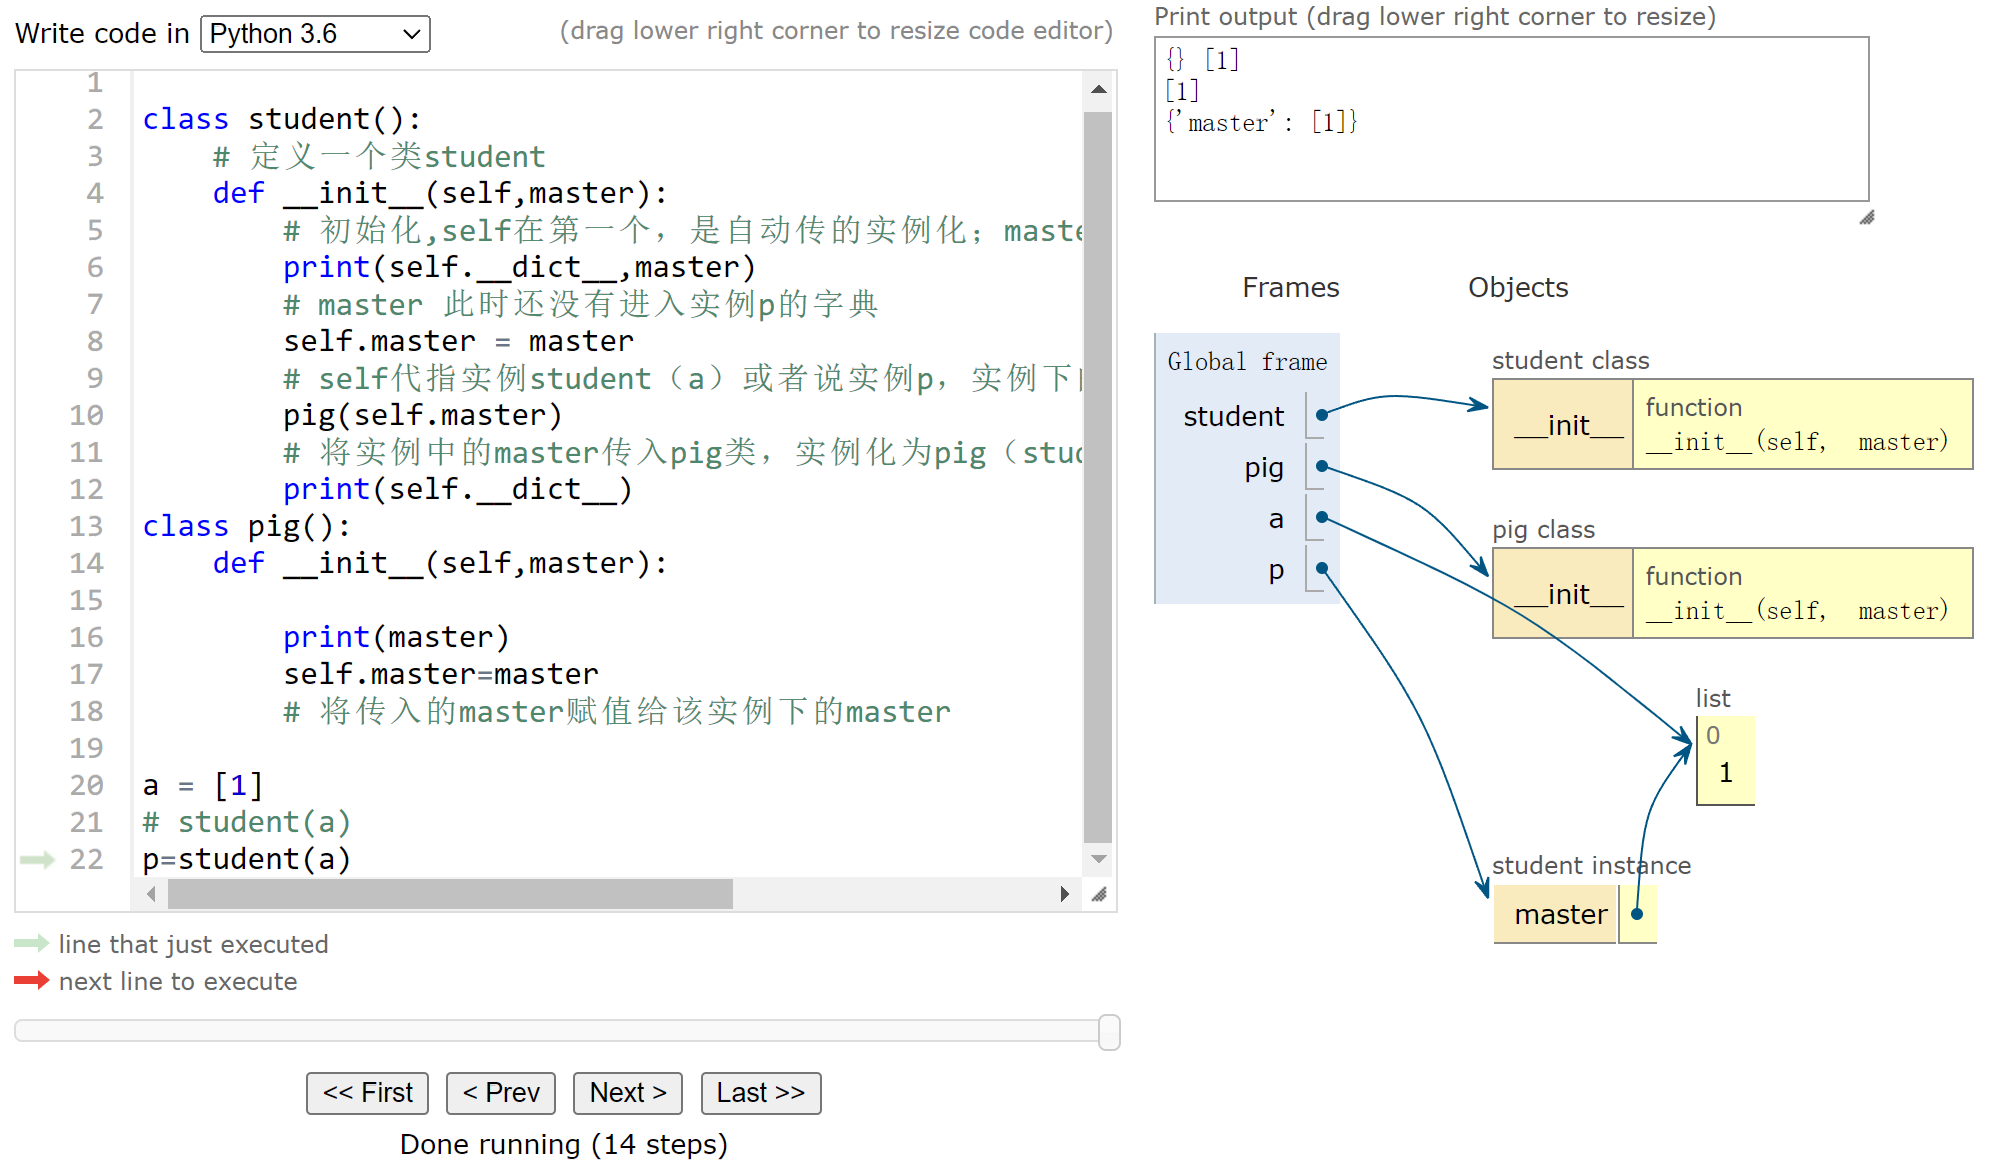
类变量和实例变量&实例调用类方法中self的作用
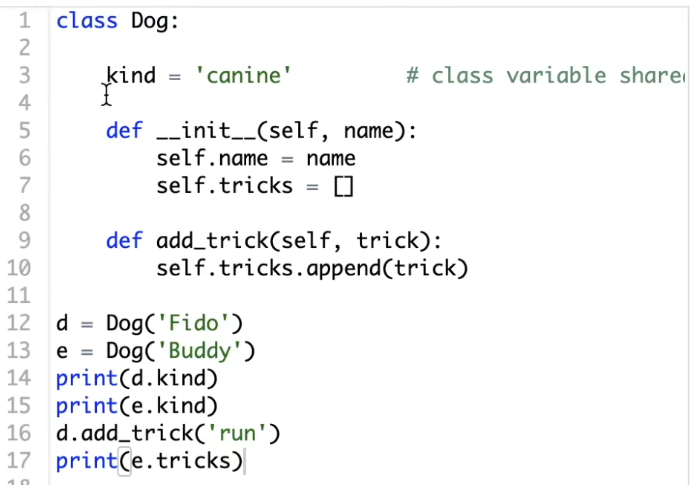
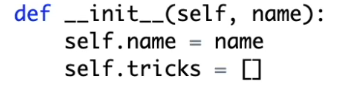
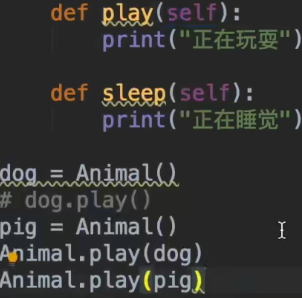
类变量将由所有实例共享

为实例初始化一个单独的实例变量

self指代要调用该类方法的实例对象

或者直接传递一个实例对象

实例化完成后该类self指代一致

实例调用sleep方法,会以实例调用eat方法

类:父子类:继承和重载

男学生从学生继承所有属性

子类使用同名方法重载方法,在子类方法中使用.super()函数以调用父类的同名方法。

传入值并访问一个类,运行完后将不保留运行结果,如果要结果在内存中保留,应该进行实例化

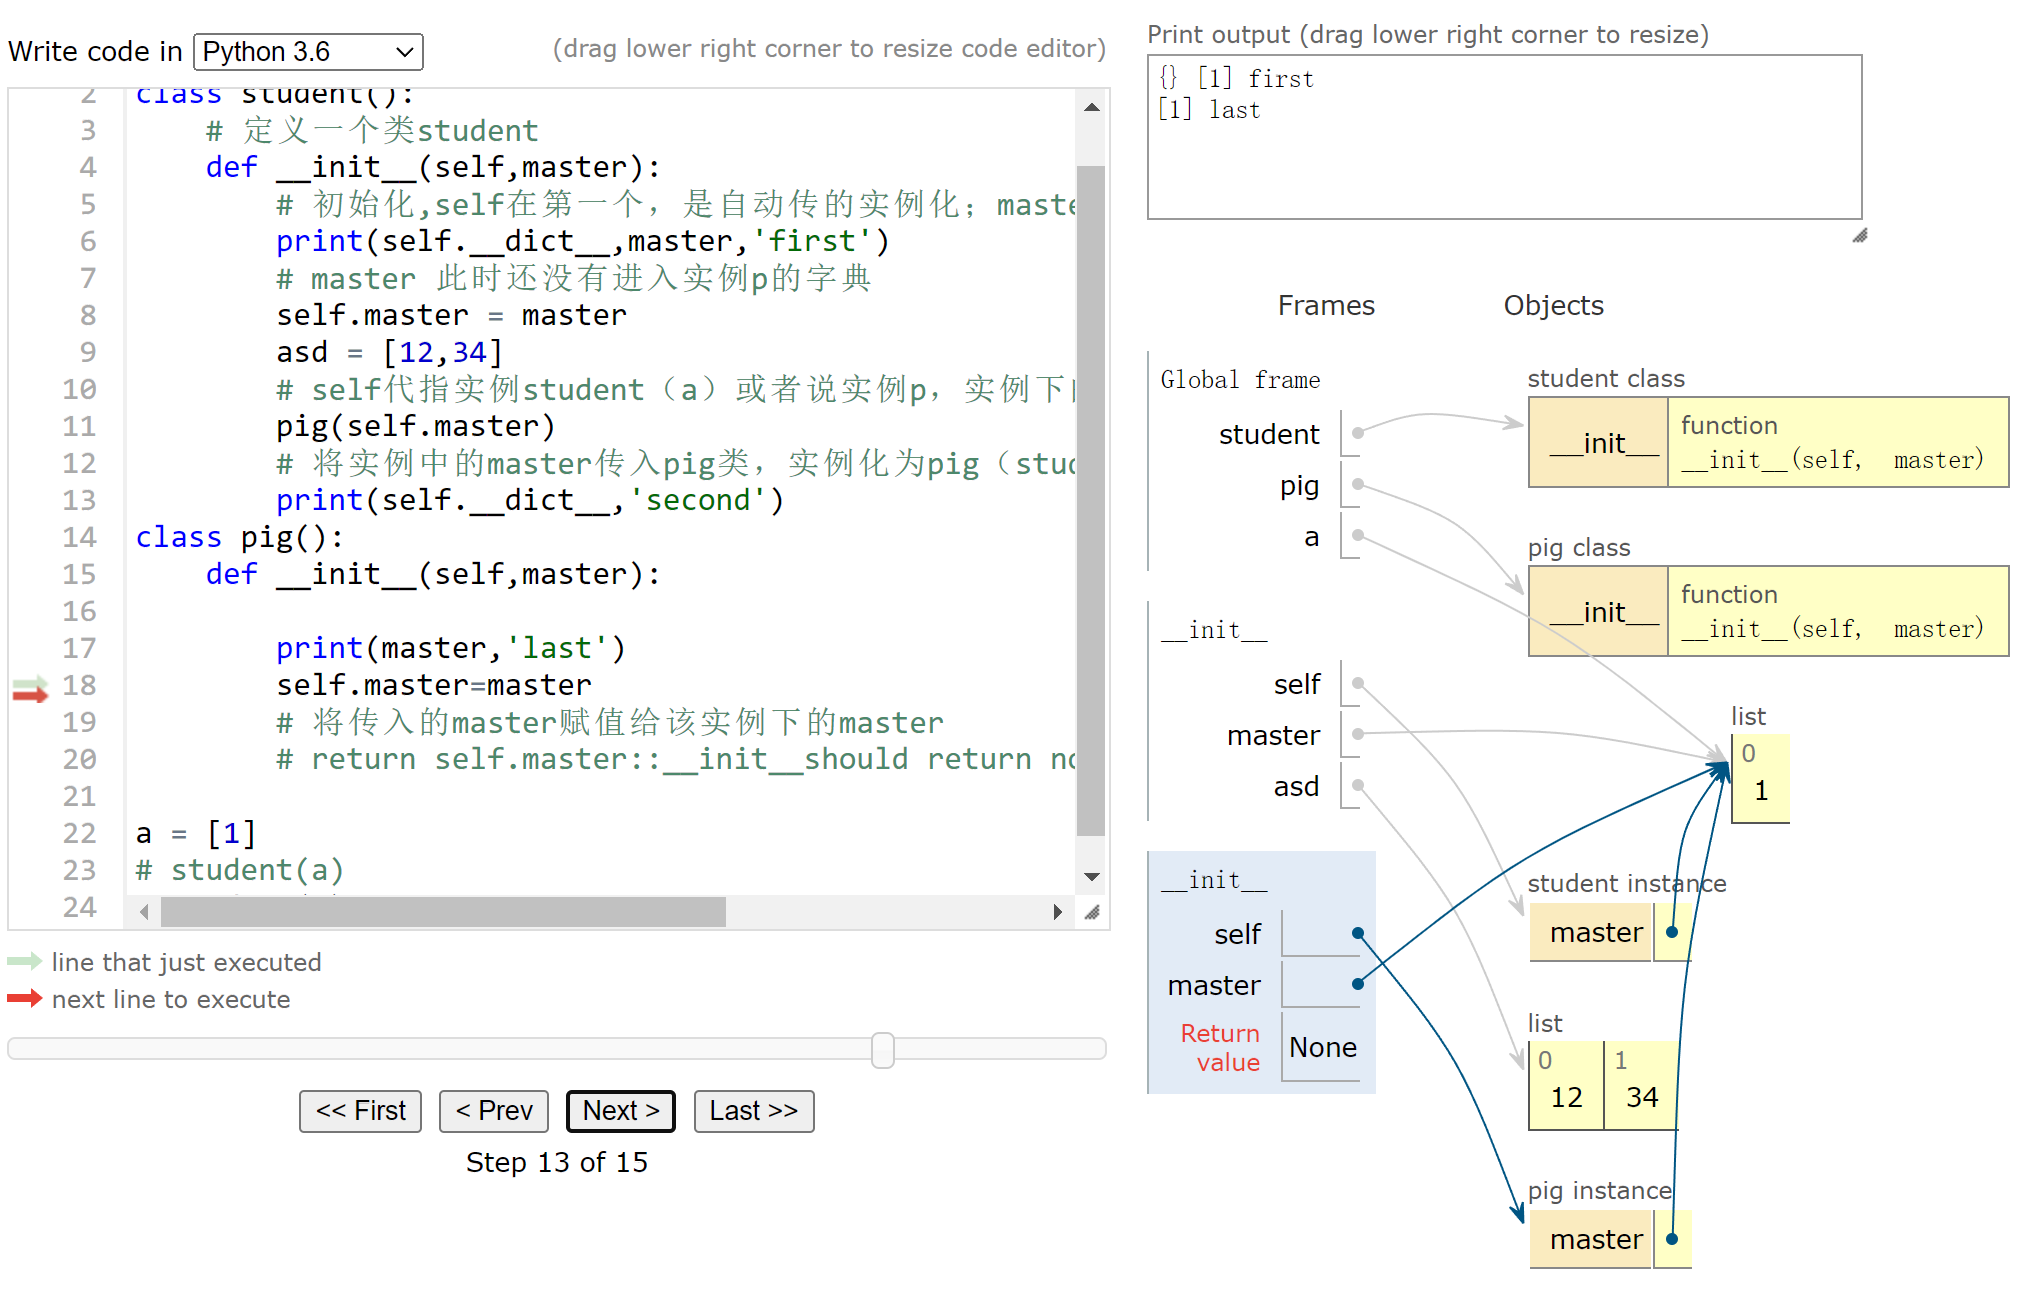
pig instance会在运行下一行代码时自动删除:

11行pig(self.master运行后pig instance被删除了)

如果要保存,则应该进行实例化:

注意看运行到14行print(second)一步

简化理解下面的代码

  1
  2
  3
  4
  5
  6
  7
  8
  9
 10
 11
 12
 13
 14
 15
 16
 17
 18
 19
 20
 21
 22
 23
 24
 25
 26
 27
 28
 29
 30
 31
 32
 33
 34
 35
 36
 37
 38
 39
 40
 41
 42
 43
 44
 45
 46
 47
 48
 49
 50
 51
 52
 53
 54
 55
 56
 57
 58
 59
 60
 61
 62
 63
 64
 65
 66
 67
 68
 69
 70
 71
 72
 73
 74
 75
 76
 77
 78
 79
 80
 81
 82
 83
 84
 85
 86
 87
 88
 89
 90
 91
 92
 93
 94
 95
 96
 97
 98
 99
100
101
102
103
104
105
106
107
108

class basedesk():  
    #定义一个类basedesk
    """
    根页面
    """
    def __init__(self,master):
        # 初始化实例并且接受一个master值
       
        self.root = master
        # 为实例构造一个root 其值为传入的master
        self.root.wm_geometry("990x830+288-5")
        # 对实例中的root运用方法wm_geometry
        self.root.resizable(0, 0)
        # 对实例中的root运用方法resizable
        #self.root.geometry('200x200')
        #face2(self.root) 
        initface(self.root) 
        # 实例化一个initface类,将刚刚实例化的basedesk类的root值传入
def init_(root,imgdex=imgdex,path=imgs[0]):
  	    # 定义一个方法:init_传入参数root,imgdex,path
        paned = tk.PanedWindow(root)
        # 定义一个tk对象,继承自root
        paned.pack(fill=tk.X, side=tk.LEFT)
        # 将对象pack
        img = Image.open(imgdex+path)
        # 打开图片
        paned.photo = ImageTk.PhotoImage(img.resize((900, 830)))
        tk.Label(paned, image=paned.photo).grid(row=0, column=0)
        # 封装图片
                   
class initface():
    # 定义一个类initface
    """
    页面1
    """
    def __init__(self,master):
        # 实例初始化,传入一个master值
        self.master = master
        # 为实例(self代指)增加一个master键和值为传入的master
        #基准界面initface
        self.initface = tk.Frame(self.master,)
        # 为实例定义一个initface,值为使用方法tk.Frame构造的frame、这个frame的父对象为实例下的master
        self.initface.pack()
        # 封装initface
        init_(self.initface,imgdex,imgs[inum.inum])
        # 调用 init_方法
        btn = tk.Button(self.initface,text='next',command=self.change)
        # 为实例初始化一个变量btn,使用方法tk.Button赋值……
        btn.pack()
        btn_back = tk.Button(self.initface,text='back',command=self.back)
        btn_back.pack()
        btntobo = tk.Button(self.initface,text='to_mirror',command=self.to_mirror)
        btntobo.pack()
        btncra(root_=self.master,master=self.initface)
        # 使用方法btncra

    def to_mirror(self):
        # 针对实例的类方法
        inum.inum+=1  
        self.initface.destroy()  
        # 销毁实例下的face
        face2(self.master) 
        # 使用类face2
    def change(self,):  
        inum.inum+=1  
        self.initface.destroy()   
        face1(self.master)  

    def back(self):
        inum.inum-=1
        self.initface.destroy()
        face1(self.master)
        
 
class face2():
    """
    页面3
    """
    def __init__(self,master):
        self.master = master
        self.face1 = tk.Frame(self.master,)
        self.face1.pack()
        a,b=mirror()
        init_(self.face1,a,b)
        btn1 = tk.Button(self.face1,text='next',command=self.change)
        btn1.pack()
        btn_back = tk.Button(self.face1,text='back',command=self.back)
        btn_back.pack()
        btnmirr = tk.Button(self.face1,text='to_body',command=self.to_body)
        btnmirr.pack()
        btncra(root_=self.master,master=self.face1)
    def to_body(self):
        self.face1.destroy()   
        initface(self.master)  
    def back(self):
        inum.inum-=1
        self.face1.destroy()
        face3(self.master)
        
    def change(self,):  
        inum.inum+=1  
        self.face1.destroy()   
        face3(self.master)  
class picnum():
    def __init__(self) -> None:
        self.inum = 0
        

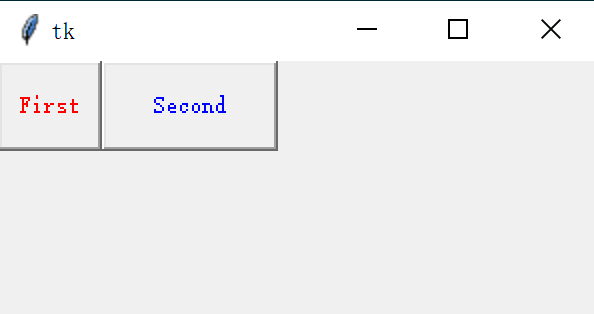
有的过程是不需要或者不应该一直占用内存,比如说第一个页面initface和第二页face2,如果每次都实例化类存在内存里面,显然对于电脑性能来说这不是好事。

但是在过程之中,有时候我们需要多次调用类运行结果或者保证类实例化状态不断被读取跟进,而不是每次重头到位运行一遍,这时候将类实例化就很有必要了。

二、一个点子

纵横英语-快速背单词

三、Python tkinter自定义消息窗口messagebox

messagebox可以让一个window弹出来

tkinter提供了七个常用窗口,并且通过对 "_show" 这个函数传入不同的参数达到不同的显示效果

 1
 2
 3
 4
 5
 6
 7
 8
 9
10
11
12
13
def _show(title=None, message=None, _icon=None, _type=None, **options):
    if _icon and "icon" not in options:    options["icon"] = _icon
    if _type and "type" not in options:    options["type"] = _type
    if title:   options["title"] = title
    if message: options["message"] = message
    res = Message(**options).show()
    # In some Tcl installations, yes/no is converted into a boolean.
    if isinstance(res, bool):
        if res:
            return YES
        return NO
    # In others we get a Tcl_Obj.
    return str(res)

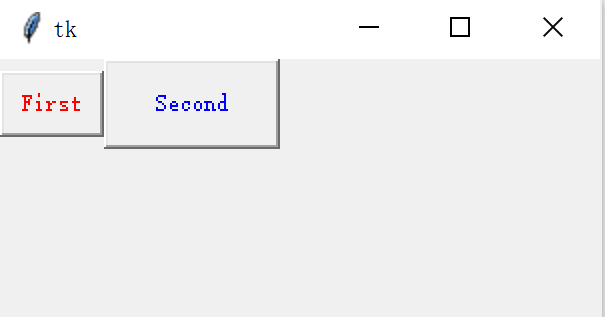
其中,只有res = Message(**options).show()负责显示。Message是这个文件的自定义类,理论上如果我们需要自定义一些功能只需要自定义一个类继承Message,从而在子类之中增加新的功能。

Message类就定义了一个command属性:

1
2
3
4
5
from tkinter.commondialog import Dialog
class Message(Dialog):
    "A message box"

    command  = "tk_messageBox"

父类Dialog的代码:

 1
 2
 3
 4
 5
 6
 7
 8
 9
10
11
12
13
14
15
16
17
18
19
20
21
22
23
24
25
26
27
28
29
30
31
32
33
34
35
36
37
38
39
40
41
42
43
44
from tkinter import *

class Dialog:

    command  = None

    def __init__(self, master=None, **options):
        self.master  = master
        self.options = options
        if not master and options.get('parent'):
            self.master = options['parent']

    def _fixoptions(self):
        pass # hook

    def _fixresult(self, widget, result):
        return result # hook

    def show(self, **options):

        # update instance options
        for k, v in options.items():
            self.options[k] = v

        self._fixoptions()

        # we need a dummy widget to properly process the options
        # (at least as long as we use Tkinter 1.63)
        w = Frame(self.master)

        try:

            s = w.tk.call(self.command, *w._options(self.options))

            s = self._fixresult(w, s)

        finally:

            try:
                # get rid of the widget
                w.destroy()
            except:
                pass
        return s

show方法中用于显示的代码:

w = Frame(self.master)

s = w.tk.call(self.command, *w._options(self.options))

Dialog类自己并不用于显示,而是新建了一个Frame对象w,并且调用了w.tk.call方法。

下载图标

首先搜索到类似的图标,下载过来,类似这样:

自定义类

 1
 2
 3
 4
 5
 6
 7
 8
 9
10
11
12
13
14
15
16
17
18
19
20
21
22
23
24
25
26
27
28
29
30
31
32
class TimeMessage(tk.Tk):
    # 继承字tk.Tk类
    def __init__(self, **kwargs):
        # 接收参数带=号
        tk.Tk.__init__(self)
        #初始化父类

        self._title = kwargs["title"]  #参数:标题
        self.message = kwargs["message"]  #参数;显示信息
        self.timing = kwargs["timing"]   #倒计时秒:为0则无倒计时功能
        self.detail = kwargs["detail"]  #详细信息(显示详细信息)

        self.details_expanded = False
        self.d_signal = False
        # self.withdraw()

        self.height = 0
        self.width = 0
        self.textbox = None  # 详细文本
        self.scrollbar = None  # 滚动条
        self.pic_frame = None  # 图片区域
        self.top = None

    def show(self):

        if self.timing:
            count_thread = threading.Thread(target=self.count_time)
            count_thread.start()
            #开多线程
        if not self.detail:
            self.detail = self.message
        self.top_window(self.detail) # 渲染一个TopLevel类用于消息显示,调用top_window类方法进行生成页面
 1
 2
 3
 4
 5
 6
 7
 8
 9
10
11
12
13
14
15
16
17
18
19
20
21
22
23
24
25
26
27
28
29
30
31
32
33
34
35
36
37
38
39
40
41
42
43
44
45
46
47
48
49
50
51
    def top_window(self, detail):
        '''
       该方法构建了弹窗的各个组分
        '''
        #类方法:传入detail
        self.top = tk.Toplevel()
        #创建一个toplevel
        self.top.title(self._title)
      # 设置title
        self.top.resizable(False, False)
        #改变大小
        self.top.rowconfigure(2, weight=1)
        #大小与位置参数:row
        self.top.columnconfigure(0, weight=1)
		#大小与位置参数:column
        self.pic_frame = tk.Frame(self.top)
        #创建一个frame继承top
        self.pic_frame.grid(row=0, column=0, sticky="nsew")
        #渲染frame

        text_frame = tk.Frame(self.top)
        #声明一个frame
        text_frame.grid(row=0, column=1, columnspan=2, sticky="nsew", padx=(0, 10))
        #渲染
        text_frame.columnconfigure(0, weight=1)
        text_frame.columnconfigure(1, weight=1)
        #设置参数
        ttk.Label(text_frame, text=self.message[:100]).grid(row=0, column=0, columnspan=2, pady=(20, 7))
        #声明一个label,使用ttk的类优化

        button_frame = tk.Frame(self.top)
        #声明一个frame'
        button_frame.grid(row=1, column=1, columnspan=2, sticky="nsew", padx=(0, 10))
        #渲染
        button_frame.columnconfigure(0, weight=1)
		
        ttk.Button(button_frame, text="OK", command=self.destroy).grid(row=0, column=1, sticky="e")#按钮函数:销毁页面
        ttk.Button(button_frame, text="<<<Details", command=self.toggle_details).grid(row=0, column=2, sticky="w")#按钮函数:显示details
        #声明两个button

        detail_frame = tk.Frame(self.top)
        #声明一个frame
        detail_frame.grid(row=2, column=0, columnspan=3, padx=(7, 7), pady=(7, 7), sticky="nsew")
		#声明一个frame盛textbox
        self.textbox = tk.Text(detail_frame, height=6)
        self.textbox.insert("1.0", detail)
        self.textbox.config(state="disabled")
        self.scrollbar = tk.Scrollbar(detail_frame, command=self.textbox.yview)
		#设置滚动条
        self.top.protocol("WM_DELETE_WINDOW", self.destroy)
		#绑定函数

按钮绑定的两个函数

 1
 2
 3
 4
 5
 6
 7
 8
 9
10
11
12
13
14
15
16
17
18
19
20
21
22
23
24
25
26
27
28
29
30
31
32
33
34
35
36
    def toggle_details(self):
        if not self.details_expanded:
            #如果details_expanded线程是none,换句话说页面参数为0(最小化或者关闭状态)
            '''
            > x = 0  
			>>> not x  
			True  
            '''
            print(self.width)
            #看看宽度
            self.textbox["width"] = int((self.width-10)//7.7)
            '''
            双斜杠(//)表示地板除,即先做除法(/),然后向下取整(floor)。 
            至少有一方是float型时,结果为float型;两个数都是int型时,结果为int型
            '''
            self.textbox.grid(row=0, column=0)
            self.scrollbar.grid(row=0, column=1, sticky='nsew')
            #渲染
            self.top.geometry("{}x{}".format(self.width, self.height+105))
          #  窗口大小改变
            self.details_expanded = True
			#改变线程状态为true
        else:
            self.textbox.grid_forget()
            self.scrollbar.grid_forget()
            #取消渲染
            self.top.geometry("{}x{}".format(self.width, self.height))
            #窗口大小为0
            self.details_expanded = False
            #改变线程状态为False

    def destroy(self):

        super().destroy()
        self.d_signal = True
		#调用父方法,销毁页面

加载图片

图片的加载必须要在类实例化后进行,?。部分代码被写入"_show“函数中:

 1
 2
 3
 4
 5
 6
 7
 8
 9
10
11
12
13
14
15
16
17
18
19
20
21
22
23
24
25
26
27
28
29
30
31
32
33
34
def _show(title, message, detail, icon, timing, _type):
    #传入参数title, message, detail, icon, timing, _type
    if message is None:
        message = ""
    else:
        message = str(message)
	#处理message格式:字符串
    if title is None:
        title = _type
       #处理title
    window = TimeMessage(title=title, message=message, detail=detail, timing=timing)
    #实例化timemessage,传入参数
    window.show()
    #调用类方法,生成窗口并且渲染
    if icon:
	#如果有icon
        window.top.iconbitmap(icon)
        #生成map
    path = PATH[_type]
    #路径
    img = Image.open(path)
    #图片
    photo = ImageTk.PhotoImage(img)  
    # 在root实例化后创建,否则会报错##
    label = tk.Label(window.pic_frame, image=photo)
    #使用label显示图片
    label.grid(row=0, column=0, pady=(15, 0), sticky="w", padx=(15, 5))
	#渲染
    window.top.update()
    #刷新top
    window.height = window.top.winfo_height()
    window.width = window.top.winfo_width()
	#重置宽高
    window.mainloop()
CTRL-/